


Once your podcast audio has been recorded, there are a few more steps before it’s release-ready. And one of those steps is the ‘mastering’ stage. If you’re not sure what mastering is (in an audio context), check out this explainer article.
If you want to learn how to master podcast audio yourself, read on!
Put simply, there are two main goals when mastering a podcast episode. And they are –
- Making sure the episode is the correct loudness (not too loud and not too quiet)
- Ensuring that the final file is created with all of the right settings for your podcast host
How To Master Podcast Audio
Once everything’s edited and mixed, it’s time to create the MP3 file that will be sent back to the client. The process requires proficiency with digital audio workstation (DAW) software. Examples of DAWs include Audacity, GarageBand and Pro Tools. Some DAWs are free and more simple to use, while others have a cost and are designed for professional audio engineers.
If you’d like to try your hand at mastering, use whichever DAW you have, or try it on a free DAW first (like Audacity). At the end of this article, you’ll find a video tutorial so you can see the process in action.
At Clarion, we follow these steps and guidelines to ensure that the loudness and format are correct for any podcast host.
1. Limiting
Place a limiter plugin on a mix bus or the master fader of your DAW with the ceiling set at -1db. If you don’t have a mix bus set up, you can create one in most DAWs the same way you can create a new track. Or you can place the limiter on the master bus which is normally set up for you when you start a new session.
We set the ceiling at -1db to ensure nothing hits 0db and distorts, and because some platforms require it.
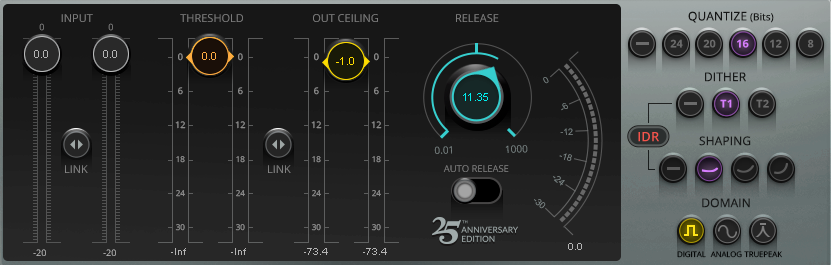
A typical limiter setup for a podcast master
2. Overall Loudness
Insert a loudness meter plugin after the limiter. This is to ensure that the average loudness across the whole episode is at -16 LUFS integrated. Some additional level balancing may be required if this target isn’t hit when you export the episode the first time.
If you don’t have a loudness meter plugin, Youlean offers a free version of it’s plugin.
We aim for a loudness of -16 LUFS integrated because this is the standard for most podcast players, such as Spotify. If the loudness of your episode is lower than this, it may sound quiet next to other podcasts. If the loudness is higher, it will be compressed down by Spotify’s algorithm, and this could affect the sound quality.

Ideal overall loudness for a podcast episode
3. Dither
The limiter plugin you used should be able to apply dither, which lets you export your episodes to a 16-bit MP3 file.
If your raw recordings were recorded in 24-bit or higher, exporting to a file with a lower bit depth (like an MP3 would likely have) can cause unwanted noise to be added to your audio. Applying dither prevents this.
Set the ‘dither’ or ‘quantize’ setting to 16-bit.
4. Export
When it’s time to export/bounce your final MP3 file, leave 2 seconds of dead air at the end and approx. 0.2 seconds at the beginning.
Export to a stereo 128kbps MP3 file with complete and accurate ID3 tagging. Most DAWS will allow you to add ID3 tags such as title, artist, album and track number.
For huge podcasts, (e.g. 2 hours long), the podcast host may have issues with the file size. If this occurs, consider reducing the bit rate to 96kbps.
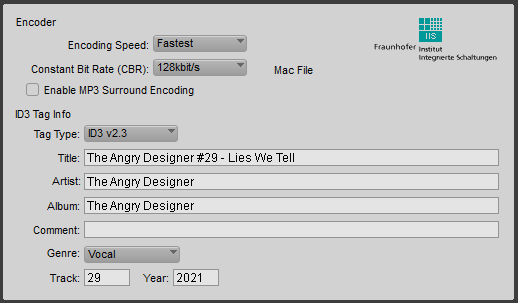
Tagging the MP3 file
5. Quality control
Double-check the files by viewing the tags and checking that they’re correct. Right-click on the MP3 file and click Properties > Details (on PC).
Re-import the file back into your DAW and play the start and end. Make a visual check of the audio waveform to ensure there are no drops. This can indicate that a track my have not been included in the final render.
If needs be, reference against previous episodes.
See the process in action
Is learning how to master podcast audio not for you, but you want to ensure you’re getting the highest possible quality results? Get in touch today and let us deal with the technical side of things.